
I needed to replace my oil pan baffles in my new to me 2020 Evora GT. The sales person looked at me like I had 2 heads when I asked if they changed the oil pan baffles. He could never remember to ask the service manager either.
It bugged me that the apparent options were replace an OEM baffled oil pan with an aftermarket baffled pan. Do some searching and you will find the aftermarket pans have limited clearance to the middle pipe. Really high heat and oil leads to burn off and oil break down. Yes, you can add insulation and reduce the heat transfer.
Or
Every 2 years or 18k miles pull my oil pan to replace these pieces of rubber. Rubber, hot oil, fuel, and flexing lead to failure. Also removing the oil pan in the tight space increases the propensity for damage to the pan and the mating surfaces.
I decided to find a different option.
I prefer to do my own work. If you pay for someone else to do the work, beware. In my case the ^%$*& (read mental giant) wrench turner didn't know what 10 newton meters was or how to remove a pan the correct way.
They stripped out the threads in the aluminum for one bolt. The bolt was held in place by the gasket material. I was lucky that a longer bolt and lock nut solved the issue (that was likely the source of my oil leak)
They also mangled the pan mating surface in 2 locations. Careful filing reduced the ridges. Hondabond will hopefully do the rest.
Here is the solution I found (It also cost the same or less than the lotus rubber gate valves):
2 sets of Improved Racing EMR-201-KIT
10 Each #6-32 screws 3/8" or 1/2" I used 1/2" and spent time ratcheting the screw through. I would suggest 3/8" if I had to do it again. - I opted for hex head - 1/4" socket
10 each #6-32 lock nuts - 5/16" socket
Washers if you want.
I chose #6 screws because it allowed easy movement within the Lotus slots. #8 would make this a harder task.
You will need to drill the IR baffle holes for the #6 screw - 9/64" works
Here are photos comparing brand new Lotus gate valves with the aluminum baffles.
![Image]()
![Image]()
Here is a photo of a compromise by using these baffles. There will be oil leakage here. Not anymore than the gap between the baffle plates and the oil pan. I am not convinced the rubber baffles fully seat every time, they are flexible and deflect differently by blowing on them. I can't say the IR baffles leak more or less than the OEM pieces.
I only had to knock off one weld marble for the baffles to sit flat. Slight tap it came off.
For all the baffles I didn't want the baffle to stick baffle plate (think suction cup). I solved this by rounding the bottom edge of the baffles slightly. I checked that each one would fall away under gravity with oil applied to both surfaces.
I started with the center of the 3 side baffles.
This is the highest baffle.
I had to trim some off the top.
![Image]()
![Image]()
I had to bend the Toyota baffle plate slightly. The two points were the problem. Small crescent wrench, pliers, etc. I would not use a Dremel and abrasive wheel unless you can get all of that debris out.
I had to bend the IR baffle corner back slightly to provide clearance for the puddle weld.
![Image]()
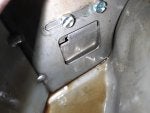
I then moved to the baffle in the drain plug chamber.
I had to bend the Toyota baffle plate slightly for clearance.
![Image]()
The 3rd baffle did not require modifications.
It bugged me that the apparent options were replace an OEM baffled oil pan with an aftermarket baffled pan. Do some searching and you will find the aftermarket pans have limited clearance to the middle pipe. Really high heat and oil leads to burn off and oil break down. Yes, you can add insulation and reduce the heat transfer.
Or
Every 2 years or 18k miles pull my oil pan to replace these pieces of rubber. Rubber, hot oil, fuel, and flexing lead to failure. Also removing the oil pan in the tight space increases the propensity for damage to the pan and the mating surfaces.
I decided to find a different option.
I prefer to do my own work. If you pay for someone else to do the work, beware. In my case the ^%$*& (read mental giant) wrench turner didn't know what 10 newton meters was or how to remove a pan the correct way.
They stripped out the threads in the aluminum for one bolt. The bolt was held in place by the gasket material. I was lucky that a longer bolt and lock nut solved the issue (that was likely the source of my oil leak)
They also mangled the pan mating surface in 2 locations. Careful filing reduced the ridges. Hondabond will hopefully do the rest.
Here is the solution I found (It also cost the same or less than the lotus rubber gate valves):
2 sets of Improved Racing EMR-201-KIT
10 Each #6-32 screws 3/8" or 1/2" I used 1/2" and spent time ratcheting the screw through. I would suggest 3/8" if I had to do it again. - I opted for hex head - 1/4" socket
10 each #6-32 lock nuts - 5/16" socket
Washers if you want.
I chose #6 screws because it allowed easy movement within the Lotus slots. #8 would make this a harder task.
You will need to drill the IR baffle holes for the #6 screw - 9/64" works
Here are photos comparing brand new Lotus gate valves with the aluminum baffles.
Here is a photo of a compromise by using these baffles. There will be oil leakage here. Not anymore than the gap between the baffle plates and the oil pan. I am not convinced the rubber baffles fully seat every time, they are flexible and deflect differently by blowing on them. I can't say the IR baffles leak more or less than the OEM pieces.
I only had to knock off one weld marble for the baffles to sit flat. Slight tap it came off.
For all the baffles I didn't want the baffle to stick baffle plate (think suction cup). I solved this by rounding the bottom edge of the baffles slightly. I checked that each one would fall away under gravity with oil applied to both surfaces.
I started with the center of the 3 side baffles.
This is the highest baffle.
I had to trim some off the top.
I had to bend the Toyota baffle plate slightly. The two points were the problem. Small crescent wrench, pliers, etc. I would not use a Dremel and abrasive wheel unless you can get all of that debris out.
I had to bend the IR baffle corner back slightly to provide clearance for the puddle weld.
I then moved to the baffle in the drain plug chamber.
I had to bend the Toyota baffle plate slightly for clearance.
The 3rd baffle did not require modifications.