
I recently installed an exterior mounted 12V magnetic connector for my Evora's battery tender. This is a great solution for hooking up tenders on our Evoras without having to open the hatch again. In fact, as simple as it is, I think that this is probably the best mod I've done to my car so far.
Here's some of the pros of the install:
1. No longer have to pop the hatch every time you park the car or go to take the car out (to plug/unplug battery tender).
2. If by chance the battery does go flat, you can put a tender on it so you can get 12V power to pop the hatch for a battery replacement.
3. If you forget to disconnect the tender prior to driving off, it will disengage by itself without damage.
4. Due to the magnetic coupling, no power flows through the socket terminals when it is not connected.
5. Once installed, it literally takes 2 seconds to connect/disconnect.
And here's the cons:
1. Time to install (didn't really take that long :grin2")
2. Requires that you drill one hole to mount the power socket port.
Obviously, the pros completely outweigh the cons!
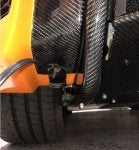
As mentioned above, the only hole that I drilled was to mount the actual connector port. I could have made a bracket to mount it so that I did not have to drill a large hole in the car. However, placement of the bracket would probably have made the port more obvious. Plus, I'd still have to drill holes to mount the bracket. On my GTE rear bumper, mounting the port down low worked great for me.
Because of the mounting location I chose, I did not have to drill additional holes anywhere to get the wires down to the port. Instead, I ran the wires from the battery, around the back of the trunk and out the small vent located behind the carpet on the driver's side (there's a rubber flap on the outside of the vent). The wires easily dropped down to the port mounting location (very easy to grab with diffuser removed).
This was a very basic and easy install. And, although I installed it on my GTE rear bumper, this will also work with OEM Evora NA/S/400 bumpers. It probably can even be mounted on the side of the diffuser FINISHER (not the diffuser itself unless you were to disconnect the wiring every time you drop the diffuser). So, you just have to pick your mounting location, check to make sure the wires drop down easily enough to where you would like to place it, and verify proper clearance behind it prior to drilling.
Here are the basic steps to do the install.....
(NOTE: If you do not know how to do basic wiring on a car, please seek professional assistance or continue with the install at your own risk.)
1. Drop the rear diffuser by removing the two M8 button head bolts and the seven M8 hex head bolts. (You could also remove the left rear wheel and drop the wheel liner after removing the push pins if you would like. But, I did not do this.)
2. Remove the battery housing cover by removing the knurled knobs or thumbscrews based on your model year (on MY '10 -'11, you have to lower the rear bulkhead carpet first to get to the battery box.)
3. Loosen the plastic hatch latch striker cover by removing the two M6 nuts and one screw. Then, pull the driver's side free so that you can move the rear carpet down and see the vent area.
4. Determine and mark your power socket mounting location behind the lower left wheel area (after verifying there is no obstruction and enough clearance behind it) and drill a hole using a 1-1/8" / 29MM hole saw.
5. Preliminarily run your wires (using the appropriate gauge based on your tender) from the battery box to the lower hole by going around the trunk on the driver's side (under the carpet) and out the cabin ventilation vent located at the rear of the trunk on the driver's side (there is a rubber flap on the vent that allows the wire to easily pass through- run the wire in the vent corner so the flap still covers most of the vent.) Then, go under the vehicle and reach up in the lower fender area to grab the wire.
6. While in the lower fender area, slide the socket port connector's large plastic nut over the wires, then feed the wires through the mounting hole you drilled. I also used Painless Wiring PowerBraid Split Braid Sleeving over the wires for added protection.
7. Terminate your wires at the magnetic socket connector's mount using female spade crimp connectors. Pay attention to proper +/- polarity as marked on the mount. Use heat shrink tubing over the female spade terminals. After pushing the spade terminals onto the connector, push the connector into the hole and secure with the large plastic nut (you previously fed the wires through) from within the lower fender.
8. At the battery box end, add an appropriately rated in-line fuse (based on your tender) on the pos/+ lead. Then, terminate your wires at the battery box using ring connectors while again paying attention to proper +/- polarity. Check your wiring one last time prior to fastening the wires to the battery terminals.
(NOTE: YOU SHOULD NOT HAVE TO COMPLETELY REMOVE THE BATTERY CABLES TO INSTALL THE RING CONNECTORS, THUS AVOIDING TRIPPING THE AIRBAG LIGHT. HOWEVER, AS A PRECAUTION, DO NOT ATTEMPT THE BATTERY HOOK UP WITHOUT WAITING AT LEAST 30 MINUTES AFTER SHUTTING DOWN THE CAR AND REMOVING THE KEY TO ALLOW THE VARIOUS SYSTEMS TO SHUT DOWN IN THE APPROPRIATE SEQUENCE.)
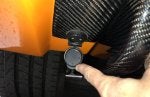
9. Wire the plug end of the magnetic connector to your battery tender while paying attention to proper +/- polarity and finish assembly of the connector.
10. Attach the magnetic connector to the port to test. Most modern tenders will indicate if there is a polarity issue.
11. If everything is working correctly, put the diffuser, battery cover, carpet and plastic hatch latch striker cover you loosened back in place. (If you removed the rear wheel, re-install rear wheel/wheel liner and properly torque the bolts.)
The best part about this connector is that Sherman at HethelSport just put together a comprehensive installation kit that works with the popular battery tenders. He supplies all of the necessary connectors, wiring, wiring cover, fuses, PLUS a pre-wired cable adapter for your brand of tender which makes the installation even easier. He even goes one step further by adding an optional secondary fuse in case you want further battery protection.
You can order the kit at: Battery Charger Connection Kit | HethelSport
or contact Sherman at Support@HethelSport.com for additional information.
Now you can enjoy charging without popping your hatch. :wink2:
Here's some of the pros of the install:
1. No longer have to pop the hatch every time you park the car or go to take the car out (to plug/unplug battery tender).
2. If by chance the battery does go flat, you can put a tender on it so you can get 12V power to pop the hatch for a battery replacement.
3. If you forget to disconnect the tender prior to driving off, it will disengage by itself without damage.
4. Due to the magnetic coupling, no power flows through the socket terminals when it is not connected.
5. Once installed, it literally takes 2 seconds to connect/disconnect.
And here's the cons:
1. Time to install (didn't really take that long :grin2
2. Requires that you drill one hole to mount the power socket port.
Obviously, the pros completely outweigh the cons!
As mentioned above, the only hole that I drilled was to mount the actual connector port. I could have made a bracket to mount it so that I did not have to drill a large hole in the car. However, placement of the bracket would probably have made the port more obvious. Plus, I'd still have to drill holes to mount the bracket. On my GTE rear bumper, mounting the port down low worked great for me.
Because of the mounting location I chose, I did not have to drill additional holes anywhere to get the wires down to the port. Instead, I ran the wires from the battery, around the back of the trunk and out the small vent located behind the carpet on the driver's side (there's a rubber flap on the outside of the vent). The wires easily dropped down to the port mounting location (very easy to grab with diffuser removed).
This was a very basic and easy install. And, although I installed it on my GTE rear bumper, this will also work with OEM Evora NA/S/400 bumpers. It probably can even be mounted on the side of the diffuser FINISHER (not the diffuser itself unless you were to disconnect the wiring every time you drop the diffuser). So, you just have to pick your mounting location, check to make sure the wires drop down easily enough to where you would like to place it, and verify proper clearance behind it prior to drilling.
Here are the basic steps to do the install.....
(NOTE: If you do not know how to do basic wiring on a car, please seek professional assistance or continue with the install at your own risk.)
1. Drop the rear diffuser by removing the two M8 button head bolts and the seven M8 hex head bolts. (You could also remove the left rear wheel and drop the wheel liner after removing the push pins if you would like. But, I did not do this.)
2. Remove the battery housing cover by removing the knurled knobs or thumbscrews based on your model year (on MY '10 -'11, you have to lower the rear bulkhead carpet first to get to the battery box.)
3. Loosen the plastic hatch latch striker cover by removing the two M6 nuts and one screw. Then, pull the driver's side free so that you can move the rear carpet down and see the vent area.
4. Determine and mark your power socket mounting location behind the lower left wheel area (after verifying there is no obstruction and enough clearance behind it) and drill a hole using a 1-1/8" / 29MM hole saw.
5. Preliminarily run your wires (using the appropriate gauge based on your tender) from the battery box to the lower hole by going around the trunk on the driver's side (under the carpet) and out the cabin ventilation vent located at the rear of the trunk on the driver's side (there is a rubber flap on the vent that allows the wire to easily pass through- run the wire in the vent corner so the flap still covers most of the vent.) Then, go under the vehicle and reach up in the lower fender area to grab the wire.
6. While in the lower fender area, slide the socket port connector's large plastic nut over the wires, then feed the wires through the mounting hole you drilled. I also used Painless Wiring PowerBraid Split Braid Sleeving over the wires for added protection.
7. Terminate your wires at the magnetic socket connector's mount using female spade crimp connectors. Pay attention to proper +/- polarity as marked on the mount. Use heat shrink tubing over the female spade terminals. After pushing the spade terminals onto the connector, push the connector into the hole and secure with the large plastic nut (you previously fed the wires through) from within the lower fender.
8. At the battery box end, add an appropriately rated in-line fuse (based on your tender) on the pos/+ lead. Then, terminate your wires at the battery box using ring connectors while again paying attention to proper +/- polarity. Check your wiring one last time prior to fastening the wires to the battery terminals.
(NOTE: YOU SHOULD NOT HAVE TO COMPLETELY REMOVE THE BATTERY CABLES TO INSTALL THE RING CONNECTORS, THUS AVOIDING TRIPPING THE AIRBAG LIGHT. HOWEVER, AS A PRECAUTION, DO NOT ATTEMPT THE BATTERY HOOK UP WITHOUT WAITING AT LEAST 30 MINUTES AFTER SHUTTING DOWN THE CAR AND REMOVING THE KEY TO ALLOW THE VARIOUS SYSTEMS TO SHUT DOWN IN THE APPROPRIATE SEQUENCE.)
9. Wire the plug end of the magnetic connector to your battery tender while paying attention to proper +/- polarity and finish assembly of the connector.
10. Attach the magnetic connector to the port to test. Most modern tenders will indicate if there is a polarity issue.
11. If everything is working correctly, put the diffuser, battery cover, carpet and plastic hatch latch striker cover you loosened back in place. (If you removed the rear wheel, re-install rear wheel/wheel liner and properly torque the bolts.)
The best part about this connector is that Sherman at HethelSport just put together a comprehensive installation kit that works with the popular battery tenders. He supplies all of the necessary connectors, wiring, wiring cover, fuses, PLUS a pre-wired cable adapter for your brand of tender which makes the installation even easier. He even goes one step further by adding an optional secondary fuse in case you want further battery protection.
You can order the kit at: Battery Charger Connection Kit | HethelSport
or contact Sherman at Support@HethelSport.com for additional information.
Now you can enjoy charging without popping your hatch. :wink2: